Building a King Size Bed Frame: A Detailed Guide
Constructing a king size bed frame is a rewarding project for individuals with basic woodworking skills, offering a customized solution that saves money and allows for personalized design choices. This project requires careful planning, precise measurements, and a dedication to detail to ensure a sturdy and aesthetically pleasing result. This guide provides comprehensive instructions on building a robust and functional king size bed frame.
Before commencing the construction process, it is crucial to gather all necessary materials and tools. A comprehensive list ensures a smooth workflow and minimizes interruptions. Essential materials include lumber, screws, wood glue, sandpaper, and finishing supplies. Required tools encompass a measuring tape, saw (circular or miter saw recommended), drill, screwdriver, level, and safety equipment such as safety glasses and ear protection. The quality of materials directly impacts the durability and longevity of the bed frame; therefore, selecting high-quality lumber is essential.
Understanding Dimensions and Design Considerations
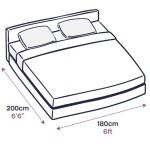
Prior to cutting any lumber, it's imperative to understand the standard dimensions of a king size mattress. A standard king size mattress measures 76 inches wide by 80 inches long. The bed frame must accommodate these dimensions with a minimal allowance for easy fitting and removal of the mattress. Typically, adding an extra inch on each side is sufficient, resulting in an internal frame dimension of 77 inches by 81 inches. The height of the frame is a matter of personal preference and can be adjusted accordingly. Consideration should be given to the desired height from the floor, the thickness of the mattress, and the desired overall aesthetic.
Design choices play a significant role in the overall appearance and functionality of the bed frame. Options range from simple, minimalist designs to more elaborate structures with headboards and footboards. The design should complement the bedroom's existing décor and cater to the user’s specific needs. For example, individuals seeking additional storage space may opt for a platform bed frame with drawers incorporated into the base. Conversely, those prioritizing a lighter, more airy feel might prefer a frame with exposed legs.
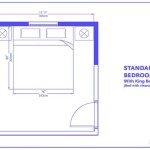
Sketching the design and creating a detailed plan with accurate measurements is highly recommended. This visual representation facilitates the construction process and helps identify potential issues before they arise. The plan should include dimensions of all lumber pieces, the type of joinery to be used, and the location of all screws and fasteners. A well-defined plan is a crucial blueprint for success.
Cutting and Assembling the Frame
With the design finalized and materials gathered, the next step involves cutting the lumber according to the specified measurements. Accuracy in this step is paramount, as even minor discrepancies can affect the overall structural integrity and appearance of the bed frame. Utilizing a miter saw or circular saw ensures clean, precise cuts. It is advisable to double-check all measurements before making any cuts to avoid costly errors.
The frame typically consists of four main pieces: two side rails and two end rails. These pieces form the perimeter of the bed frame and provide the primary support for the mattress. Once the rails are cut, they need to be joined together to create a rectangular frame. Several joinery methods can be employed, including screwing the pieces together directly, using pocket hole joinery, or employing more advanced techniques like mortise and tenon joints. For beginners, screwing the pieces together with corner reinforcement blocks is a straightforward and effective approach.
Regardless of the chosen joinery method, it is crucial to use wood glue in conjunction with mechanical fasteners, such as screws. Wood glue significantly enhances the bond between the lumber pieces, creating a stronger and more durable connection. Apply a liberal amount of wood glue to the joining surfaces before securing them with screws. Ensure that the screws are long enough to penetrate deeply into both pieces of lumber, but not so long that they protrude through the other side.
Once the four main rails are assembled, the next step is to add internal support to the frame. This is typically achieved by installing lengthwise support beams that run from one end rail to the other. The number of support beams required depends on the thickness of the lumber and the weight of the mattress. For a king size bed frame, at least three support beams are recommended to prevent sagging and ensure adequate mattress support. These support beams can be attached using screws and wood glue, similar to the main frame rails.
In addition to the lengthwise support beams, cross supports may also be necessary, depending on the chosen design and the desired level of support. These supports run perpendicular to the lengthwise beams and further reinforce the frame. The spacing between the supports should be consistent and adequate to prevent the mattress from sinking or shifting. Securely attaching all support structures is essential for the bed frame's stability and longevity.
Adding Finishing Touches and Ensuring Stability
With the main frame and support structure assembled, the next stage involves sanding and finishing the wood. Sanding smooths out any rough edges, splinters, or imperfections, creating a clean and professional look. Start with a coarser grit sandpaper to remove any major imperfections and gradually move to finer grits for a smooth, polished finish. Pay particular attention to the edges and corners of the frame, as these areas are frequently touched and should be rounded for comfort.
After sanding, apply a wood stain or paint to protect the wood and enhance its appearance. The choice of finish depends on personal preference and the desired aesthetic. Wood stains allow the natural grain of the wood to show through, while paint provides a solid, uniform color. Ensure that the chosen finish is compatible with the type of wood used and follow the manufacturer's instructions carefully.
Apply several coats of finish, allowing each coat to dry completely before applying the next. Lightly sand between coats to remove any imperfections and create a smooth, even surface. A clear topcoat can be applied as a final layer of protection, adding durability and resistance to scratches and stains.
Once the finish is dry, inspect the bed frame for any remaining imperfections or structural weaknesses. Reinforce any areas that seem unstable or require additional support. Ensure that all screws are tightened securely and that all joints are properly glued and fastened. A thorough inspection is crucial to ensure the bed frame is safe and reliable.
Consider adding padding or felt to the inside edges of the frame to prevent the mattress from rubbing against the wood and causing wear and tear. This simple addition can significantly extend the life of the mattress and reduce noise caused by movement. Similarly, attaching felt pads to the bottom of the legs can protect the floor from scratches and prevent the bed frame from sliding around.
Finally, test the bed frame by placing the mattress on top and applying weight. Check for any signs of sagging, instability, or squeaking. If any issues are detected, address them promptly by reinforcing the frame or adjusting the support structure. A well-built and stable bed frame provides years of comfortable and reliable use.
Building a king size bed frame is a challenging but rewarding project. By following these detailed instructions and paying careful attention to detail, individuals can create a customized bed frame that meets their specific needs and preferences. The result is a durable, aesthetically pleasing, and cost-effective alternative to purchasing a pre-made bed frame.

How To Build A Custom King Size Bed Frame The Thinking Closet

Modern Luxury Bed Build Plans King Size Etsy

Diy King Size Bed Free Plans Shanty 2 Chic

Easy Diy Platform Bed Frame For A King With Instructions

How To Build A King Size Platform Bed Under 100 Twin Civet

Diy Bed Frame Wood Headboard 1500 Look For 200 A Piece Of Rainbow

King Sized Deck Diy Bed Frame With Foundation For 100 Mattress Foundations Underground

Diy How To Build A Farmhouse King Size Bed Platform

How To Build A Custom King Size Bed Frame The Thinking Closet

Diy Modern Platform Bed Builds Ep 47 Youtube