Plans To Build A King Size Platform Bed: A Comprehensive Guide
Constructing a king-size platform bed can be a fulfilling and cost-effective alternative to purchasing a pre-made bed frame. This article provides a detailed guide, outlining the necessary materials, tools, and step-by-step instructions for building a sturdy and stylish king-size platform bed. The focus will be on a relatively simple design that prioritizes ease of construction while ensuring structural integrity. The dimensions provided are standard for a king-size mattress, but adjustments can be made to accommodate specific needs or preferences.
Before commencing the project, careful planning and preparation are crucial. This encompasses understanding the overall design, acquiring the required materials, and ensuring the availability of the necessary tools. Rushing into the construction phase without adequate preparation can lead to errors, wasted materials, and ultimately, a less satisfactory outcome. The following sections will detail each of these preparatory steps.
Key Point 1: Material Selection and Acquisition
The choice of materials significantly impacts the durability, aesthetics, and overall cost of the platform bed. Pine and fir are common choices for their affordability and ease of workability. However, hardwoods like oak, maple, or walnut offer superior strength and visual appeal, albeit at a higher price point. Pressure-treated lumber is not recommended for indoor furniture due to the chemicals used in the treatment process.
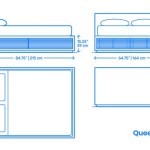
For a standard king-size platform bed (approximately 76 inches wide and 80 inches long), the following materials will be required:
*Side Rails (2):
80 inches long, 6-8 inches wide, and at least 1.5 inches thick. These provide the primary support along the length of the bed. *End Rails (2):
76 inches long, 6-8 inches wide, and at least 1.5 inches thick. These connect to the side rails to form the rectangular frame. *Center Support Beam (1):
80 inches long, 4-6 inches wide, and at least 1.5 inches thick. This runs lengthwise down the center of the bed to prevent sagging. *Support Legs (6-8):
The height of the legs will determine the overall height of the bed. Consider ease of getting in and out of bed. 4x4 lumber is commonly used for legs. *Slats (12-15):
76 inches long, 3-4 inches wide, and 0.75 inches thick. These are spaced evenly across the frame to support the mattress. *Screws:
A variety of wood screws will be needed, including 2-inch, 2.5-inch, and 3-inch screws. *Wood Glue:
High-quality wood glue to reinforce joints. *Sandpaper:
Various grits (80, 120, 220) for smoothing surfaces. *Finish (Optional):
Stain, paint, varnish, or sealant to protect the wood and enhance its appearance.When acquiring materials, it is crucial to accurately calculate the required quantities, accounting for potential waste due to cuts and mistakes. Consider purchasing slightly more lumber than initially projected to avoid shortages during the construction process. It is advantageous to inspect each piece of lumber for any defects such as warping, knots, or cracks, particularly if purchasing from a lumberyard where quality control may vary. Select pieces that are straight and free from significant imperfections to ensure a structurally sound and aesthetically pleasing final product.
The type of wood you chose will impact the overall final cost too. Remember to factor in delivery fees as some lumber may be too big to transport in a standard car.
Key Point 2: Tools and Workspace Preparation
Having the right tools readily available is essential for efficient and accurate construction. The following tools are recommended for building a king-size platform bed:
*Circular Saw or Table Saw:
For cutting the lumber to the required dimensions. A table saw offers greater precision, but a circular saw can be used effectively with a guide. *Miter Saw:
For making accurate angle cuts, especially when attaching the legs. *Drill/Driver:
For pre-drilling holes and driving screws. *Measuring Tape:
For accurate measurements. *Level:
To ensure the bed frame is level. *Square:
To ensure corners are square. *Clamps:
To hold pieces together while gluing and screwing. *Sander:
For smoothing surfaces. *Safety Glasses:
For eye protection. *Dust Mask:
To protect against sawdust inhalation. *Pencil:
For marking measurements.A well-organized workspace is equally important. Ensure ample space to maneuver the lumber and tools safely. A flat, level surface is crucial for accurate assembly. It is advisable to protect the floor with drop cloths or plastic sheeting to prevent damage from sawdust, glue, or spills. Good lighting is essential for visibility, especially when making precise cuts. Adequate ventilation is also necessary, especially when applying finishes such as stain or varnish. Consider setting up a temporary workshop in a garage, basement, or outdoor area, weather permitting. It is also important to be aware of any noise restrictions in your area, particularly if using power tools during evening or weekend hours.
Before starting construction, familiarize yourself with the operation and safety procedures for each tool. Practice using the tools on scrap wood to gain confidence and accuracy. Regularly inspect tools for any signs of wear or damage and replace or repair them as needed. A well-maintained and organized workspace contributes significantly to a safer and more efficient construction process.
Key Point 3: Assembly and Finishing
With the materials and tools prepared, the assembly process can begin. It is recommended to follow these steps for constructing the king-size platform bed:
Build the Frame:
Join the side rails and end rails using wood glue and screws. Pre-drill holes to prevent the wood from splitting. Ensure the corners are square using a square and clamps. Let the glue dry completely before proceeding.Attach the Legs:
Position the legs at the corners of the frame and attach them using wood glue and screws. Use a miter saw to create angled cuts on the legs for a more decorative look, if desired. Ensure the legs are securely attached and can support the weight of the bed and mattress. Additional legs can be added along the side rails for added support.Install the Center Support Beam:
Attach the center support beam lengthwise down the center of the frame, using wood glue and screws. This beam is crucial for preventing the mattress from sagging. Add support legs under the center beam, spaced evenly along its length.Attach the Slats:
Evenly space the slats across the frame, perpendicular to the side rails. Attach the slats using screws. The spacing between the slats should be no more than 3-4 inches to provide adequate support for the mattress. Securely fasten each slat to the side rails and center support beam.Sanding and Finishing:
Sand all surfaces of the bed frame to smooth out any rough edges or imperfections. Start with a coarser grit sandpaper (80 or 120) and gradually move to finer grits (220) for a smooth finish. Apply a stain, paint, varnish, or sealant to protect the wood and enhance its appearance. Follow the manufacturer's instructions for application and drying times. Apply multiple coats for added protection, sanding lightly between coats.
During the assembly process, it is important to double-check all measurements and connections to ensure accuracy and stability. Regularly use a level to confirm that the frame and legs are level. Use clamps to hold pieces together while the glue dries and the screws are driven. Take your time and work carefully to avoid mistakes. Once the bed frame is assembled, inspect it thoroughly for any weaknesses or imperfections. Reinforce any areas that may require additional support.
After sanding and finishing, allow the finish to dry completely before placing the mattress on the bed frame. This may take several days, depending on the type of finish used and the environmental conditions. Once the finish is dry, the king-size platform bed is ready for use. Regularly inspect the bed frame for any signs of wear or damage and make repairs as needed to ensure its continued stability and longevity.
Consider adding decorative elements such as a headboard or footboard to personalize the design. These can be constructed separately and attached to the bed frame using screws or bolts. Consider adding storage drawers underneath the bed frame, maximizing the use of space in the bedroom. With careful planning and execution, building a king-size platform bed can be a rewarding and cost-effective project that results in a beautiful and functional piece of furniture.
Remember to consult with experienced carpenters or woodworking professionals if you have any doubts or questions regarding the construction process. Prioritize safety throughout the project and always wear appropriate safety gear when using power tools.

King Sized Modern Platform Bed Printable Woodworking Plans Etsy

King Platform Bed Frame Plans Printable Woodworking Etsy

Diy Bed Frame Wood Headboard 1500 Look For 200 A Piece Of Rainbow

Free Woodworking Plans To Build A Viva Terra Inspired King Sized Vintage Fir Platform Bed The Design Confidential

Diy King Platform Bed Frame

Diy Platform Bed Frame Build Plan King Low Profile Minimalist Woodworking Plans Etsy

Diy King Size Platform Bed Howtospecialist How To Build Step By Plans
:max_bytes(150000):strip_icc()/diycandy-59ed11819390416a84b1132924085f4f.jpg?strip=all "21 Diy Bed Frames You Can Build In A Weekend")
21 Diy Bed Frames You Can Build In A Weekend

How To Build A King Size Platform Bed With Storage Crafted Beds Ltd

King Bed Build Plan